Wednesday, June 10, 2020

Hack The Box Sign-UP INVITE CODE 2020 Login Step by step Process Make Invite Code for HTB

1- open this site Link

https://www.hackthebox.eu/invite

2- Right Click on page and go select "View page source" from menu.

3- Select Console Tab.

4- In the Bottom of the console type makeInviteCode() and Enter.

5- After enter you get the code below in data. Copy the code its inscripted code.
6- Also below provide enctype "BASH64"option which provide you your decryption of this code.
7- Go to this site for decode this code, Past your code on this site and select Encode.
https://www.base64decode.org/

 8- In this output decode data you have a path "/api/invite/generate"
  Copy this path it's help to create your full url for generate key look below.

Open CMD (Window) | Terminal (Linux) and run this command.

curl -XPOST https://www.hackthebox.eu/api/invite/generate

9- After run this command you have output with Success Code. This is your final Encoded Key. Copy this code, and again decode this by same bash64 link.
https://www.base64decode.org/
 10- Now you have your fresh key for create New user Account for Hack The Box. Copy this Decode Key and past on your Hack The Box invite code input.
https://www.hackthebox.eu/invite


                    Now go for Sign-UP Your New Account.


Dual Boot (Linux,Windows10) Boot option menu missing Linux entry , Linux kernel Headers Missing , Missing VMLINUZ file, Rescue a Non-Booting GRUB-2 Operating System Missing,Crash,Corrupt

Errors :-

1- Dual Boot (Linux,Windows10) Boot option menu missing Linux entry.
2- If  Operating System missing or corrupt or crash
3- Showing Black screen with command prompt grub:
4- Missing VMLINUZ file form boot folder.
5- Missing Linux Kernel Headers.

6- How to Rescue a Non-Booting GRUB-2.

COMMON REASON:- Because Linux Kernel Headers files are missing.
  

Solutions :-

 1- Boot with live Linux OS CD/USB.
 2- Select Try Ubuntu without installing.


 3- Open terminal after booting complected run this commands.
    sudo fdisk -l  also use  sudo lsblk -l    (Both command provide disk detail. For checking your Linux disk and EFI partition detail list)
 After find your installed Linux partition and EFI partition run next command for mounting your installed disk and partition for repairing your grub.
    sudo mount /dev/sda4 /mnt      (Here sda4 is my Linux partition)
    sudo mount --bind /dev/pts /mnt/dev/pts
    sudo mount --bind /proc /mnt/proc
    sudo mount --bind /sys /mnt/sys
    sudo chroot /mnt

4- After success this full process without any error run this command
    apt-get install --reinstall linux-image-generic
(This process require some time with internet connection.)
5- Reboot the system and remove the CD/USB
6- Select 'C' for command line.

 7- This type of window (command-line) open on your screen.
 Run this command step by step on command prompt.
    ls                            (For know about your drive and partition)

    ls (hd0,gpt4)           (hd0 is my hard disk and gpt4 is my Linux partition after run ls)
    set root=(hd0,gpt4)
    linux /boot/vmlinuz-5.4.0-33-generic root=/dev/sda4           
    (use tab for your vmlinuz version which found in /boot directory replace with your version.)
     initrd /boot/initrd.img-5.4.0-33--generic          
    (use tab for your initrd version which found in /boot directory replace with your version.)
     boot
8- Finished. After boot command your computer will boot with Linux. after booting and login please update your grub with this command.
    sudo update-grub

Sunday, May 17, 2020

Windows 10 user Access Deny Installing any Software Application, How to provide user Admin Access or Change user privilege Through Safe Mode also start SAFE MODE IN WINDOWS 10

Errors

1. This ap can't run on your pc.To find a version for your pc, check with the software publisher.
2. Check the path, and then try again.
3. User not authorize to install require Admin permissions.
4. Access Deny. (When install any software).
5. How to open Safe Mode in Windows 10 Environment.
6. How to Activate Admin account, if user not have privilege to create any Admin account or activate admin account through command line. 

Solutions


Best way to Enable SAFE MODE | Activate Administrator account


Follow Steps


Search on start Menu ➞ Reset this PC ➞ Restart Now (After restarting)

➞ Troubleshoot ➞ Advanced Option ➞ Startup Setting ➞ Restart (After restart showing multiple options) ➞ Enable SAFE MODE with Command Prompt (Press number which provide in front of the options) ➞

(Login with your current user, Now you are in SAFE MODE with command prompt, Let's activate your Administrator account through this command)

net user administrator /active:yes 


 (then sign out or restart your PC. Admin account is now activated and you have permission to change your other user privilege through this account or create a new admin account )

(For deactivation Administrator account run below command)

net user administrator /active:no

___________________________________XXXX___________________________________________


Sunday, December 1, 2019

Windows server command line, kill and restart the service

Below are the commands can be used to check the hang service, you can force kill the service and restart:
1. To check the service status
a) Open command line(as administrator), telnet the service with the port as below:
telnet server_ip port
Example: telnet 10.10.10.10 9000
if telnet is failed, go to step b to kill the service:
b) sc queryex "service_name"
Example: sc queryex myservice
Note the PID and run below command to kill the service
c) taskkill /f /pid PID
Example: taskkill /f /pid 1234
To start the service from command line
d) sc start service_name
Example:  sc start myservice

Saturday, December 24, 2016

Missing 1920x1080 resolution in linux

You may have to update your grub file in order to enable the custom resolution in the below file:
$sudo nano /etc/default/grub
Find and remove # from GRUB_GFXMODE line and replace with your required resolution, so it will look like this
GRUB_GFXMODE=1920x1080
Save and exit (Press Cltr+x ,y and enter).
Run below command and reboot.
$sudo update-grub
$sudo reboot

Unzip or extract .zip file in linux

In order to unzip a .zip file in linux (Ubuntu) type this in terminal:
$unzip file_name.zip -d destination_folder
For example, to extract a file named HelloWorld.zip to my current directory:
$unzip HelloWorld.zip -d .
Here . represents current directory, you can give a path to the directory to extract into.
If you see "command not found", you need to install zip command by typing:
$sudo apt-get install unzip

Similar to this, you can zip a file by below command:
$zip filename.zip filename
To install command zip type:
$sudo apt-get install zip

Monday, September 14, 2015

Older programs not compatible with Windows 7‏ or above

Not all, but some older programs may not work in Windows 7 or Windows 8 or above. Desktop applications and software written for Windows Vista should work for Windows 7 as well but some older programs might  have compatibility issues. Before installing the software/programs, we need to check whether it is compatible with the Windows version you are using.  You might encounter an error while running programs which are not compatible for Windows 7 or others:

 Now we talk about what could be reason behind old programs not working in Windows 7. Programs designed for older versions of windows like Windows 98, Windows 2000, Windows XP or Windows Vista are tested for compatibility with these version and are not tested for future release of Windows operating systems like Windows 7 or so, we are not sure if they are going to work for newer release of Windows. However, when a newer versions of Operating system is released, this has been taken care most of the time so that older versions should work, depending on the class (or type) of device, many hardware devices need a new Windows 7 specific driver to function properly on Microsoft's latest operating system. It also depends on your operating system architecture, for an example if you are using Windows 7 64-bit and trying to install a program which is built for 32-bit motherboard, it will error out. Also, you get some options to run your software with different compatibility modes:
Let's talk about how can try to make incompatible software work in Windows 7.  User following steps to run your program in Windows 7.

Right click on the program(exe file/setup file), click on properties, click on compatibility tab and follow the instructions below, once you make change any of these properties, try running the software:
Compatibility mode: Runs the program using settings from a previous version of Windows. Try this setting if you know the program is designed for Windows 7 version of Windows.
Reduced color mode: Uses a limited set of colors in the program. Some older programs are designed to use fewer colors.
Run in 640 × 480 screen resolution: Try this setting if the graphics for the program appear jagged or are rendered improperly.
Disable display scaling on high DPI settings: Turns off automatic resizing of programs if large font sizes are used. Try this setting if large-scale fonts are interfering with the appearance of the program.
Run this program as an administrator: Some programs require administrator privileges to run properly. If you aren't signed in to your Windows 7 PC as an administrator, this option is unavailable.
Change settings for all users: Lets you choose settings that will apply to all users on your Windows 7.

You can also try running program compatibility troubleshooter in Windows 7 as below:
Run the Program Compatibility Troubleshooter:
Open the Program Compatibility troubleshooter by clicking the Start button in Windows 7, and then clicking Control Panel. In the search box, type troubleshooter, and then click Troubleshooting. Under Programs, click Run programs made for previous versions of Windows.

Workaround: Blue screen error Windows 7

Description:
It is also called "STOP Error" or "Blue screen of death"(BSOD), windows will display a message "A problem has been detected and windows has been shutdown to prevent damage to your computer".
The error screen may show different error codes as per the issue. Windows automatically creates a “minidump” file that contains information about the crash and saves it to your disk. You can view information about these minidumps to help identify the cause of the blue screen. The error is not much helpful in investigating the issue.

Cause:
This error could cause due to following reasons:
1. Due to any hardware,software or device driver issue
2. Any recent hardware/software changes made to the system
3. Critical OS data has become corrupted
4. Windows is not able to recover from it without losing data
5. System may running out of memory

Troubleshooting:
There are following solutions could be followed in order to troubleshoot the problem:
Use System Restore: If your system recently started blue-screening, use System Restore to roll its system software back to a previous state. If this works, you’ll know that it’s likely a software problem.
Scan for Malware: This could also be due to any system critical file affected by Malware. Scan your computer for malware to ensure if any malicious software causing it to crash.
Install Updated Drivers: An incorrectly installed driver can lead to crashes. Download the latest drivers for your computer’s hardware from your computer manufacturer’s website and install them — this may fix BSODs caused by driver problems.
Boot Into Safe Mode: If your computer is blue-screening every time you turn it on, try booting into safe mode. In safe mode, Windows loads only the essential drivers. If a driver you’ve installed is causing Windows to blue screen, it shouldn’t do so in safe mode. You can work on fixing the problem from safe mode. Also, check if the system is not running out of memory or the system has enough space in its windows drive.
Run DiskCheck: Run chkdsk by going to the Safe Mode and typing "chkdsk" in command prompt in order to determine any disk errors if there is any.
Check for Hardware Problems: Blue screens can be caused by faulty hardware in your computer. Try testing your computer’s memory for errors and checking its temperature to ensure that it isn’t overheating. Also, you can check your system hardware in order to make sure if everything is plugged in correctly like hard disk, RAM etc and there are no hardware connectivity issues. Replace any faulty hardware if detected.
Reinstall Windows: Reinstalling Windows is the last option. It will remove/uninstall all your existing system software and other device drivers.

Warnings: Backup your data to an external drive in Safe Mode before restoring last known good configuration or running repair diagnostics. Do not edit the registry or the start-up programs without technical assistance or how-to.

Thursday, September 3, 2015

Quick fix: The VPN client is unable to establish a connection (Cisco Anyconnect)

This is due to Internet Connection Sharing services running and might have conflicts with Cisco Annyconnect VPN. Follow below steps below to resolve the issue:
  1. Go to Task Manager
  2. Select Services tab
  3. Click on open services
  4. Right click on Internet Connection Services(ICS)
  5. Click on stop

Now try again it you should be able to connect to VPN.


Thursday, September 25, 2014

Attachment not working OWA/cannot upload file Outlook Web App

1.If you are using Google Chrome install Microsoft Silverlight on computer or as addon.
else
2.Switch to IE.
3.Update your web browsers.

Should work!

Tuesday, September 9, 2014

Skype login page opens in HTML format

Skype wont open correctly/HTML page:
Skype opens in HTML view while logging in, we have a following workaround to resolve the issue:1.Press Windows button+r or go to run and write "regedit" and press enter.
2.Then go to HKEY_CLASSSES_ROOT and find .css.
3. Under .css you will see CONTENT TYPE.
    Right click in Content Type and select modify and change this to text/css.
    Restart Skype.
Should be same as below screenshot.


Hope it helps.
Cheers!!!

Tuesday, March 19, 2013

A quick fix for "Call Of Duty MW3" Mouse cursor issue.

If you are facing issue while running "call of duty modern warfare 3" that your mouse cursor doesn't work on the screen then there is quick fix for it, which worked for me. Hope it works for you too.. good luck!!

Solution:
Once you have run COD MW3  press ALT+Tab or you can switch to any other window while the game is running. Then again press Alt+Tab to switch back to the game. You will see that the issue is resolved.


Monday, May 31, 2010

google talk hangs in windows 7 while setting status to "show the current music track"

Google talk hangs in windows 7 when I set my status "show the current music track"
FIX:Close winamp and Google Talk!!!!
Create one empty file and name it winamp.m3u copy that file into the winamp installation directory.
Start winamp and google talk.
Start playing music and set the status of Google talk to "Show the Current MUSIC Track"
You can download the m3u file creater from the below link
http://www.softpedia.com/progDownload/M3U-Creator-Download-18755.html
After installation just  press save and give the file name as winamp and place it in winamp installation folder.

Wednesday, August 26, 2009

Linux: Unable to compile or run C or C++ program

Linux uses gcc compiler for compiling C programs and g++ for C++ programs.If you are unable to compile or run C and C++ program in Linux terminal then follow these steps.
(1) Using vi or vim editor create a C file(should be named with .c extension) and do the same for the C++ program(should be saved as .cpp)
(2) Then compile C program using following command
$gcc -o destfile sourcefile
for example if you have created a file first.c then
$gcc -o first first.c
Your compiled file will be created as first.To run this file
$./first

For C++ use g++ command with same extensions.

If you are unable to compile or run C or C++ program OR you are getting error compiling C or C++ file that means you have not installed compiler gcc and g++ in your operating system.
Follow the steps for C:
$su

$yum install gcc

For C++
$yum install g++

This will install compilers for C and C++ for linux.I hope this will help you.

Linux:Unable to install or upgrade firefox in Linux

Installing or upgrading Firefox can be done by using different commands in Linux operating system..
(1) Using yum command you can upgrade your firefox or install.Open terminal and enter su then enter password. Now you are in admin mode so that you can install or upgrade firefox.
For installing anything in linux the user should be in admin mode.
syntax:
$su

$yum update firefox

(2)There is another way of installing firefox in linux that is by using wget command.To use wget command you should have link from where you can download firefox for linux.
Syntax:
$wget link

Saturday, July 18, 2009

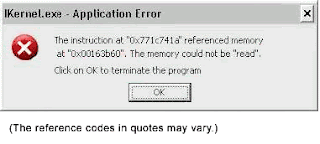
Application error: The memory could not be read.


This article applies to:
  • Platform(s): Windows 98 , Windows ME , Windows 2000 , Windows XP , Windows 2003
  • Browser(s): All Browsers
  • Java version(s): 1.4.2_xx

SYMPTOMS

While attempting to install Java, a message box apears with the following error:
    IKernel.exe - Application error

    The Instruction at "0x771c741a" referenced memory at
    "0x0..." (any number).

    The memory could not be read.


    Click on OK to terminate the program

CAUSE

The IKernel.exe application error may be due to one of the following reasons:
  1. The InstallShield engine (iKernel.exe) or one of its component files in \Program Files\Common Files\InstallShield\Engine folder may be damaged, corrupted, or read-only.
  2. The InstallShield engine (iKernel.exe) or one of its component files in \Program Files\Common Files\InstallShield\Engine folder was left on the system by an older version of the InstallShield installer (and is now incompatible with the version that Java Installer uses).
  3. You are trying to install Java on a Windows XP machine with service pack 1 and Windows XP Hotfix Q328310 applied.

SOLUTION

Following are the possible resolutions for this error. Choose the appropriate method for your computer.

  • Generic Solutions
    1. Rename or remove the old InstallShield engine folder
    2. Update InstallShield Engine
Generic Solution

Solution #1: Rename or remove the old InstallShield engine folder
iKernel.exe is the InstallShield program file.

Java setup program copies InstallShield engine files to the hard disk during Java installation. These files are copied to the folder "C:\Program Files\Common Files\InstallShield". Assuming your system drive is C:.
This InstallShield folder is used as a temporary folder by Java setup program. After you install the program, the contents of this folder are no longer needed or used.

The iKernel.exe application error may occur if the InstallShield engine (iKernel.exe) or one of its component files in "\Program Files\Common Files\InstallShield\Engine" folder is damaged, corrupt, or has read-only permission. This error may also occur if the InstallShield engine (iKernel.exe) or one of its component files in folder "\Program Files\Common Files\InstallShield\Engine" was left on the system by an older version of the InstallShield program. This is incompatible with the current version of InstallShield used by Java installer.
The user should either rename or delete this folder and rerun the setup. The InstallShield installer will then replace or install the correct engine files if they are not found on the computer. To rename the InstallShield engine folder perform the following steps:

  1. Launch Windows Explorer by right-clicking the Start menu on the system status bar and select Explorer. You can also invoke Windows Explorer by pressing Windows Key + E on your keyboard.
  2. Browse to C:\Program Files\Common Files\InstallShield\Engine
  3. Right-click the highlighted engine folder and select Delete.
  4. Click Yes in the Confirm Folder Delete message box.

UPDATE Ikernel
Download the latest version of the iKernel engine by clicking the link below and save it to your Desktop. iKernel Update

Source:http://www.java.com/en/download/help/ikernel.xml

Thursday, June 25, 2009

Internet Explorer-Runtime error

This document explains a workaround if you receive 'A Runtime Error has occurred. Do you wish to Debug?' when attempting to load a webpage in Internet Explorer.

Note: This workaround may not work in all cases. We do not have another reliable method to offer at this time.

When attempting to load a webpage you receive one of the following error messages:

  • A Runtime Error has occurred. Do you wish to Debug?
  • Internet Explorer Script Error. An error has occurred in the script on line 1. Do you wish to continue running scripts on this page?

To prevent this error from coming up, you will need to disable script and runtime errors. Perform the following to configure Internet Explorer to ignore these script and runtime errors:

  1. Open Internet Explorer.
  2. Click on Tools and select Options.
  3. Click on the Advanced tab.Put a check in the box next to Disable script debuggin


5. Remove the check in the box next to Display a notification about every script error if this box is currently checked.


  1. Click OK to confirm your changes.

This does not actually fix the problem, it merely stops the window telling you about it from coming up. In order to actually fix the problem, the code of the script needs to be modified so that it does not produce errors. This cannot usually be done by an end user, and instead needs to be done by the administrator for the webpage that the error is occurring on.

Note: Some users have reported that after trying the above steps, as well as the additional steps from Microsoft below, they discovered the problem was malware related. Before attempting the additional steps below, you should run a full virus scan.

If the window is still coming up, Microsoft has some additional steps you can try to resolve the problem

http://support.microsoft.com/kb/308260


How to create an oracle Database

  • Create an Oracle Database

    By default ProblemTracker uses a Microsoft Access database, however it can also be used with Oracle. Oracle database is a separately sold product available from Oracle Corporation and is not bundled with ProblemTracker.

    To use ProblemTracker with Oracle, you must first create a database using Oracle. You can create a database of any name, although it is recommended that it matches the workgroup name. If your Oracle software is installed on a machine with a Windows-based platform, perform the following steps to create the database. If your Oracle software is installed on a Sun Solaris platform.

    Oracle 8i on Windows platform:

    1. Start the Oracle Database Configuration Assistant.
    2. Select the option "Create a Database" and click "Next".
    3. If you wish to have a standard Oracle database, select the option "Typical (recommended)" and click "Next". But, if you wish to have the Oracle database use multinationalization, then choose the option "Custom" and click "Next" and continue with the installation.
    4. Select the appropriate method (either copy existing files from the CD, or create new database files) for creating the database and click "Next".
    5. Select the environment (either OLTP, DSS, or Hybrid/Multipurpose system) in which the database will operate and click "Next". The default and the recommended one is a hybrid system.
    6. Enter the approximate number of users who will be concurrently connected to the database at any given time and then click "Next". If you are not sure, accept the default value.
    7. Select the options you want to configure for use in the database and click "Next".
    8. Enter the workgroup name (recommended) for the Global Database Name and the SID (System Identifier) or you can enter any valid database name. If you have chosen the option "Custom" in Step 3, then click the "Change Character Set..." button and choose the appropriate character set you need. Say if you wish to have "UTF8" character set, then choose "UTF8" for the options "Character Set" and "National Character Set" in the dialog and then click "Next".
    9. Select the option "Create database now" and click "Finish". Click "Yes" to the confirmation dialog.
    10. Creation of Oracle database will take few minutes depending on the options you have chosen to configure. Please wait until Oracle gives a confirmation stating that the database has been created and then note the Global Database Name, SID, SYS and SYSTEM account passwords in a safe place.

    Oracle 9i on Windows or Sun Solaris platform:

    1. Start the Oracle Database Configuration Assistant.
    2. Select the option "Create a Database" and click "Next".
    3. Select the option "General Purpose" and click "Next".
    4. Enter the Global Database Name in the form "databasename.domain" and the System Identifier (SID) in the form "databasename", then click "Next". It is advised that you select the database name to match the workgroup name that you will be using. However, using a different name is acceptable.
    5. Select the option "Dedicated Server Mode" and click "Next".
    6. Select the "Custom" option.
    7. If you do not plan to use multinationalization, skip to the next step. If you wish to have the Oracle database use multinationalization, then click on the "DB Sizing" tab. In the "Database Character Set" field, select "UTF8".
    8. Click "Next". Click "Next" once more.
    9. Check the option for the option "Create Database" and click "Finish".
    10. Click "OK" to confirm the creation of the database.
    11. Click on the button "Save as an HTML file" to save the database parameters, then click "OK" to proceed with creating the database.
    12. After the database creation operation has completed successfully, click on the "Password Management" button to change the default password and unlock the database accounts of the new database.

    Oracle 10g on Windows platform:

    1. Start the Oracle Database Configuration Assistant. Click "Next".
    2. Select the option "Create a Database" and click "Next".
    3. Select the option "General Purpose" and click "Next".
    4. Enter the Global Database Name in the form "databasename.domain" and the System Identifier (SID) in the form "databasename", then click "Next". It is advised that you select the database name to match the workgroup name that you will be using. However, using a different name is acceptable.
    5. Check the option "Configure the Database with Enterprise Manager", and accept the default selection for other options and click "Next".
    6. Enter a Password and Confirm Password for all accounts or you can enter different passwords and click "Next".
    7. Select the storage mechanism as "File System" and click "Next".
    8. Select the location of the Database files to be created. If you are not sure as what to choose, select the option "Use Database File Locations from Template" and click "Next".
    9. Choose the recovery options for the database and click "Next".
    10. Uncheck the option "Sample Schemas" and click "Next".
    11. In the "Memory" tab, select the "Custom" option.
    12. If you do not plan to use multinationalization, skip to the next step. If you wish to have the Oracle database use multinationalization, then click on the "Character Sets" tab. In the "Database Character Set" field, click "Choose from the list of character sets", and select "UTF8" from the list. Also select "UTF8" for the "National Character Set". Click "Next".
    13. If you wish, you can review (and modify) the control file, data files and redo log groups for the database. Click "Next".
    14. Select the option "Create Database" and click "Finish".
    15. Click on the button "Save as an HTML file" to save the database parameters, then click "OK" to proceed with creating the database.
    16. After the database creation operation has completed successfully, click on the "Password Management" button to change the default password and unlock the database accounts of the new database.

    Now you have successfully created an Oracle database.

  • How to check CPU speed

    Windows Vista/Windows 10/Windows 8.1

    To check the CPU speed, click Start. In the search box, enter msinfo32 .

    Or press Windows+r and type msinfo32 for full computer discription.

    Your computer's CPU speed will appear in the processor description. For instance, in "x86 Family 15 Model 1 Stepping 2 Genuine Intel ~1495 Mhz", the CPU speed is 1495MHz (i.e., 1.495GHz).
    Windows NT, Me, 2000, or XP

    To check the CPU speed, from the Start menu, select Run... , and then enter msinfo32 .

    Your computer's CPU speed will appear in the processor description. For instance, in "x86 Family 15 Model 1 Stepping 2 Genuine Intel ~1495 MHz", the CPU speed is 1495MHz (i.e., 1.495GHz).


    Thursday, June 18, 2009

    How to make lan connection and configure IP address

    First of all go to My network places And right click the mouse button then click properties then a new window display that show the your Lan card connection right click on that an click on their property option...that show a new window which have many option ......click on tcp/ip an click on their property in it if u connected with server then obtain automatic IP address if u r connected individually then fill manually ip address then click on OK.an again OK....now goes to my computer right click here and click on the property here if your computer name is same then change it if different then OK . It should be always advisable than your computer have different name but have same group name,click OK,it will ask u to restart your computer,restart this,if u check the connection is establish or not then click on start and then click on run type ping and the computers ip address u want to check for eg...ping 192.168.0.1 press enter


    go to start->control panel->network connections->local area connection->properties(Right click)->tcp/ip->use manual ip and assign address.

    If u do not get help from above details then use this link
    http://support.microsoft.com/kb/306126

    Set up gmail in outlook using app password

    You might receive an error saying, "unable to connect to your outgoing server" while setting up a gmail account in outlook even wh...